Lamp Post
- Mike Barber

- Aug 23, 2021
- 4 min read
Updated: Aug 25, 2021


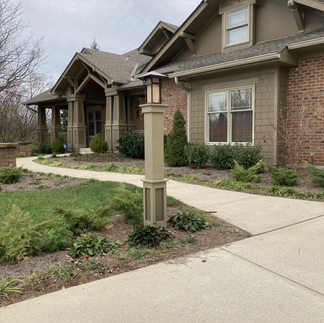


The lamp and lamp post we had installed when we built the house was looking sad and tiny so I decided last fall to upgrade both the lamp and post. As you can see in the photo on the left, the old one was leaning from an encounter with a vehicle backing out of the driveway. I wonder who did that? Rather than replace the post, I decided to straiten it, remove the sagging cross bar, replace the lamp with a larger one and wrap a rectangular post around it. To avoid problems with water damage to the post, I decided to make it out of PVC trim boards that I purchased at Menards. The Royal White Trim boards cost $150 and glue another $25 and acrylic caulk to fill nail and screw holes was $2, The lamp is a Hinkley Harbor 19 1/2" Outdoor post mounted lamp from Lamps Plus that cost $450. I removed the light sensing switch in the post and wired the lamp directly to the indoor switch and replaced the switch with a Leviton Programmable timer with an astronomical clock. That meant that the light would go on exactly at sunset each day and go off at sunrise each day. All in all, the project cost just over $650 and took about 15 hours to build, install and paint.

I purchased 2 12' x 1" x 8" and 1 8' x 1 x 6" to build the post. I decided to build a simple box and apply trim to the box to create the panels on the bottom. I cut the 8' boards to 62" on my cross cut saw and cut a 45 degree bevel on each edge which created a 7" face on each board on the table saw. You could also use a track saw to make these and other bevel cuts needed for this project. I then laid out 3 of the boards on an assembly table to prepare for gluing.

I then positioned two side pieces on the bottom piece and held them in place with right angle braces. You could easily use right angle braces made out of plywood and screwed to a piece of plywood in place of these specialty assembly braces. The next step is to glue the 4th piece on the open side. Note, you can use plumbing PVC glue on PVC boards but it sets very fast and will leave more visible glue lines. I used a special glue made for PVC board and fences. It takes longer to set up giving you greater flexibility in clamping up the pieces and it is white which makes the glue lines nearly invisible. The goal of this step is to make a 3 sided post and not a 4 sided one. I found that it made installation much easier because I had already installed the new light on the post.

With glue applied to the side pieces, the top was placed on the two sides and light clamping was needed to counter a slight spreading of the pieces.

While the glue was drying, I made 4 of these brackets out of pressure treated wood to fit inside of the post so that I could attach the post to the original aluminum post. I waited to make these until I had the three sides glued up so I could get a perfect fit inside the post. I made them by cutting a 3" hole with a hole cutter on the drill press in the center of the block. You could also use a 3" hole saw on a drill if you do not have a drill press. I then cut the slots on the bandsaw. A handheld jig saw would make the cut as well.

With the glued sides dry, I nailed the 4 mounting blocks inside the post and positioned them so that the trim pieces would cover the nail holes for the bottom two blocks. I then turned the post over and applied the bottom trim pieces to the post.

The trim pieces were glued and pinned to the post. the pin holes were so small that they did not need any filling before painting. Note that the corner trim pieces were glued up prior to putting them on the post.

I then stood the post up and trimmed out the remaining two sides. Then the post was ready for mounting to to the post. If you look closely, you can see that I have drilled holes in the post through the mounting blocks so that I can screw the post to the aluminum post.

The post is now ready to take outside and attach it to the existing post.

Here I have placed the post around the aluminum post and adjusted the height so that the gap at the top is 3/4" by propping up the bottom with a board. I then screwed the post to the aluminum post through the mounting blocks with 2" self taping metal screws. The next step is to glue on the back panel of the post and apply the trim. I used a combination of clamps and pin nails to attach the back and trim.

The next step was to apply the top band trim and the top plate. The band was created with mitered boards and the top pieces was made with two pieces with a 3 1/2" slot in the middle of each piece to fit around the base collar of the lamp. The top pieces were glued together to make a seamless top. I forgot to mention that the Royal PVC trim board come with a smooth side and a grained side. I thought the grained side looked better for this project.

The final job was painting the post the trim colors of the house. I used a Sherman Williams acrylic latex exterior paint on the post. The post and lamp have done well through the winter and I anticipate will give many years of service.

I hope this helps you build a similar project for your home.


Comments